Tuesday, May 31, 2016

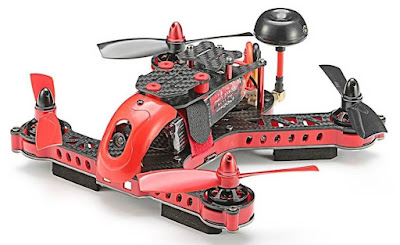
Blade 185 Build

The Blade-185 (ARF) arrived last weekend so I started on it Sunday. This is my first quad with Naze32 and CleanFlight, so all this is new to me. This post will be edited over the next few days.

General Notes:
  • Never connect main lipo battery without rear FPV antenna connected (you might damage video-TX).
  • Black prop-nuts screw-on in normal direction (for CCW spinning props)
  • Red prop-nuts screw-on in backwards direction (for CW spinning props)
  • Props are 4045 and should not be installed during any of this setup.

FrSky Receiver Install:

This quad is very small and I had worries about spinning props hitting the wires (or maybe the battery if it shifts a bit during a crash). I decided to move the battery to the top (so it was no longer in same "plane of rotation" as props). It slides right into the "frame" I made with two black nylon wire-ties. I had a spare FrSky X6R, so I decided to use that for now. The tubing keeps antenna wires bundled (but not actually touching). This should work until I more permanently mount the RX later (in its final location with foam tape).


You can peak through the rear carbon-fiber frame to access Dip-Switches.
For SBus, on Dip-A set 1=ON , 2=OFF.
Connected supplied 3-wire cable from Blade's small white radio connector to SBus port on X6R receiver (first port on the X6R, at the very beginning). Watch polarity of black Dupont plug since this is also how the radio gets its 4.5v power (in addition to SBus signal on white wire).

Setup Model #3 on Taranis transmitter:
- Mode = D16
- Channels Range (CH) = 1-16
- Receiver (RX) = 03

For the X6R Binding ... for now, I just used Mode-5 (D16). This one is the "no-jumper" easy-bind and should be fine since I'm not using any of the physical RC-channel outputs on RX (only SBus). When it's properly bound, the light on the X6R will turn green (and might flash green at times). Having a properly connected and Binding radio set is your first step in making the constant beeping go away. This appears to be a good safety feature. Once the Naze32 Flight-Controller is sure that a working radio is connected, the beeping will stop. To program and setup the Naze32 FC, I will use CleanFlight software.

CleanFlight:

On Windows-10/64bit, first, I installed Google Chrome. Then installed the CleanFlight Configurator v1.2.2.

Follow the link to install the Windows Silicon Labs CP2104 driver for Naze32 (in my case, the Default 64bit driver). After it installs, connect micro-USB cable to Blade. You should get the Windows-chime that a new USB device was detected and the proper driver should load and install from driver-cache. Now that Windows sees the quad and its Flight-Controller, CleanFlight should be able to also.

In CleanFlight (video), proceed to click Connect in upper right-hand corner. I'm in no way a guru at any of this and did some significant jumping around during setup while figuring stuff out. I even had some problems that the helpful forum users helped me with. All that said, here are my current working settings, and my best recollection of the steps I followed (or rather, the proper steps you should follow).

  • Setup
    • Calibrate Accelerometer
      • Let sit still on level surface
    • Calibrate Magnetometer (compass)
      • Within 30 seconds, evenly spin on each of 3 axis (R, P, & Y)
    • Save your config if you want (I do this often as I make changes and progress)
  • Ports
    • UART-1
      • Data = MSP/115200
        • Never change this or else USB port will quit working.
    • UART-2
      • RX = Serial RX
  • Configuration
    • Mixer = Quad-X
    • Receiver Mode = RX_Serial (SBus)
    • Serial Receiver Provider = SBus
    • ESC & Motor Features
      • Motor_Stop & Dis-Arm Motors (5 secs)
      • Throttle numbers are Min=1000, Middle=1500, Max=2000, Min_Cmd=1000
        • Some of these likely need adjustment, but theses do work/fly.
    • Battery Voltage (VBat Monitoring = ON)
    • System Configuration
      • Loop Time = 2000
    • Other Features
      • Telemetry
      • LED_Strip
      • Black-box
  • Receiver
    • Select Option for JR/Spektrum
      • That will give you TAER1234 (Throttle, Aileron, Elevator, Rudder, Aux1-4)
      • By now your radio TX/RX set should be working. Turn on Taranis, and see it respond in CleanFlight. If it does, beeping should stop.
  • Motors
    • You can can perform a calibration of all ESCs (All-At-Once) by clicking the check box at the bottom with the battery disconnected. Then using the master slider, slide it to the top turning all motors to full throttle in CleanFlight. With the sliders at full throttle connect the lipo battery, the ESCs will beep indicating throttle calibration mode, then immediately click at the bottom of the slider and it will return to zero throttle. The ESCs will beep indicating calibration is complete.
    • You can also just test your motors here.
  • Modes
    • Setup some modes ... like Angle flight-mode (Auto-Level) on your main switch. (video)
  • Sensors
    • Move and manipulate the Blade quad and watch sensors respond.
CleanFlight Firmware Flashing

After your are familiar with how everything works, you can load the current Naze32 "stable" firmware. This is the program or code that runs on the various flight controllers that CleanFlight supports.

If you haven't already, first ... Backup your quad's Configuration using CleanFlight.

You should be "Disconnected" for this procedure. The icon that looks like a chip on the left menu is for Firmware Flashing screen. For Board model, I selected "Naze". The Firmware versions are listed in order, with newest ones near the top. I selected "v1.12.1 NAZE 2016-4-10 (Stable)". Scroll to the bottom of this screen to see the messages. First, the firmware file will auto-download to your computer, then you can click the button to use it. At the end, you should get a "Successful" message.

After it finished, I Re-Connected, double-checked my settings, and re-did my calibrations.

Taranis (model programming)

On Model 3, the Mixer screen, add a switch or two to be used for AUX 1-4 for your Flight Modes, Modifiers, etc. This is real easy ... for Mixer CH5-8, you simply set desired Switch as the SOURCE and save/exit the Mix. Other than changing the text name of the Model, this is all I initially programmed on Taranis (and it flies in Angle flight-mode fine).


You can now see switches responding in CleanFlight and can assign modes and functions to them.
When testing the model, on the main model flight screen of Taranis, you should have FrSky Telemetry working by now. You will know when you see the Input voltage and RSSI as being read from X6R on Taranis LCD.

I'm sure there is still more to setup (like Fail-Safe) and tweak (like PIDs). This video looked good and seemed to have some advanced content in it (will watch and learn later). But for now, but I'm eager to see if she even flies.


Maiden Flight

Ok, now I can say my new Naze32 quad is air-worthy and I've flown it.  Just newbie baby-steps today. I flew thru a battery in Angle Flight-Mode by LoS in the yard. Angle is like Stabilize flight-mode on APM-based quads. Blade-185 seems stable, fast, and even hovers good. Didn't see any problems with balance (since battery was moved to top). Didn't really test range, but worked fine with strong RSSI during flight.

Saturday, May 21, 2016

HexaCopter s550 - Custom Build - Start Frame

Enough parts have arrived to start the build. I'm still waiting on motors, ESCs, and PixHawk FC. This SK s550 hexacopter frame seems nice. All the parts are clearly labeled and packaged well. All the parts and holes seem to line up properly so far.

Just following the directions. Be sure to select the correct bottom board (PDB), know which side is right-side-up, and notice arrow pointing forward.

Install set-screws in the 4 half-circle mounts, but leave them backed-off a bit so (closed-ends) bars slide easily for now. Use 8 proper screws to attach both under-carriages plates to hangers. Attach both of these carriage assemblies to bars before completely tightening the 8 screws that hold the half-circle mounts ( since the hangers are what determines the exact distance). I plan to slide bars out any time payload carriages or hangers need to be re-configured.


I assembled the landing gear, but left them un-attached from bottom PDB for now. Seems like it will be easier to solder ESCs onto board this way.


Next up ... installing ESCs. They should be here in a week or so. I think I will just edit and continue this post for a while.

Saturday, May 14, 2016

Eachine Blade-185 RC Quadcopter - FPV Racing Drone (ARF)

I just ordered a Eachine Blade 185 FPV racing quadcopter.

http://www.banggood.com/Eachine-Blade-185-FPV-Racing-Drone-with-OSD-5_8G-40CH-HD-Camera-ARF-p-1052500.html?p=NR1603976533201412HJ


I got the ARF model, that come with Naze32 FC and LiPo battery. I plan to install a FrSky X6R receiver, and use my existing FrSky Taranis radio. However, I saw they also have a Ready-To-Fly model (RTF complete with radio, GPS-Module pre-installed, and battery). In fact there is currently a coupon for this RTF combo.

Blade 185 (ARF) Notable Features (what caught my attention):
  • Naze32 Flight Controller (Rev6 10DOF with 32bit processor)
  • Includes Compass, Altimeter/Barometer
  • GPS capable
  • Runs CleanFlight
  • Nice CF-frame with LEDs and various component mounting options
So, I was out-back yesterday, trying to do some FPV with my little Hubsan 107d. It flies fine indoors and even outside with a little wind. The problem is that if it lands on even slightly tall grass, it can't take off again because its props get tangled in the weeds. So then you have to take the FPV goggles off, stand-up from chair, and go get it. I decided it's just too frustrating outside (unless you only fly over a trimmed golf-course or turf).

I put that little quad aside for the moment, and did some pre-sales research on my options. I don't have time to start another custom build, so I ordered this Blade-185 ARF today. The pilots in the forums seem to like it. I decided that if I'm going to try this, I need a proper FPV aircraft to use.

I'll post more about it after it arrives. It's in-stock and shipping from Chinese warehouse, so it should be here in around 2 weeks.

Thursday, May 12, 2016

Custom Build - s550 HexaCopter

I plan to build this 550-sized Hexa-Copter as my first custom build.

http://www.banggood.com/S550-Hexcopter-Frame-Kit-With-Integrated-PCB-550mm-Black-p-978627.html?p=NR1603976533201412HJ
Frame s550 Hexacopter  (with up-swept arms)
Motors x6 EMax MT-2216 810kv (3cw/3ccw with bolt-on PropAdapters)
Props 10 inch 1045 (12 included with 6 motors)
ESC x6 ZTW Spider 30amp SimonK 600Hz Opto
Bullet Connectors 3.5mm (x18 for ESCs)

Battery Glacier 14.8v 4s-6000mah 30c LiPo (comes with EC5 and 10awg)
BEC & PM Dual-Voltage (5.3v@3A / 12v@3A / 120A PowerModule)
Wiring for Battery, BEC, & PM : 10awg and EC5 Connectors

Flight Controller PixHawk PX4 v2.4.8 "Full-Size" w/ all ports & v3-mcu (2mb ok)
GR-BD GPS/ Compass Combo Module (uBlox Neo-M8N & HMC5883L compass - Black)
Telemetry Radio Set 3DR/SiK-915mhz 500mW (upgraded wattage)

Gimbal-3D Storm32 (180g)
Camera Xiaomi-Yi  1080p-60fps MP4-H.264 (Ambarella Image Processor)
FrSky X8R Receiver (with SBus & Telemetry)

I'm estimating it will weigh around 2100-2200grams
I would like a THR_MID around 500, and a 15 minute run time.
The max prop for this frame is 10inch. At 14.8v, these 2216 motors pull 15amps max each.

I'm less concerned about price, and more concerned with flexibility and dependability of this aircraft. I don't want to be "closed in" or limited. I will be using it to do general hobby LoS flying, Auto-Missions, Aerial Photography, and maybe some experimental stuff like LiDar-Lite.

A big thanks goes out to the pilots and builders over on RCGroups that helped me analyze my initial configuration and come up with this final parts-list. I'm ordering these parts now.

Wednesday, May 11, 2016

Eachine EV800 RC FPV Goggles with 5-inch 480p Screen & 40ch 5.8ghz Video Receiver

I've got a set of these EV800 FPV Goggles on order. I've always been a Line-of-Sight RC-aircraft pilot. I'm still not sure if hard-core FPV quad racing is right for me, but casual FPV flying seems like fun. Plus, the price is right on this entry level set.

http://www.banggood.com/Eachine-EV800-5-Inches-800x480-FPV-Goggles-5_8G-40CH-Raceband-Auto-Searching-Build-In-Battery-p-1053357.html?p=NR1603976533201412HJ


If you examine the hardware-specs, you can see this is really more like a 2nd generation set ... only now available in 2016 for this price. Click any link in this post for full specs on the sales page (they are currently taking pre-orders).

I will know more after I get mine delivered, but here are my initial impressions about it's features. I suppose these are also the reasons why I decided to buy them :)

  • The 480p (DVD quality) resolution screen should be fine for a good picture from the common CCD 600TVL-700TVL cameras that are usually used now-days on FPV aircraft and racers. The screen is also spec-ed at 600cd/m2 brightness, which should work nicely outside with sun.
     
  • The included and built-in 5.8ghz video receiver includes all the common frequency bands, for a full 40 channels of available individual frequencies (including RaceBand). There should be no problem finding a matching empty/clear one for use with your model aircraft. There is also plenty to share at flying field, and it will even auto-select one for you if you want.
     
  • Looks like the front "goggles part" comes-off and you can easily mount the main screen unit on a common tripod. This is good for FPV newbies like myself. We can fly normally line-of-sight (LoS) or look into nearby screen to fly FPV. You can also just use it  to "line-up" aerial video and photography shots (which is really handy ... you see what multi-rotor sees). You can transition between either mode as you see fit.
     
  • It says the battery is also included, so this set of FPV goggles is ready to go ... just connect wirelessly to your aircraft.
I will post more about the goggles after I get them.

Oh ... when I ordered them, I paid the extra $2 for Priority Direct Mail and Shipping Insurance. Then, I simply paid with PayPal. Actually, this is what I always do when ordering items from them. I'm in USA (Texas) but In-Stock items ship fast and show-up on my door-step in a couple of weeks (even all the way from China).

Usage Update:

The EV800 FPV Goggles work pretty good and picture is clear. Not going to do full review because others have. About 90% of the reviews are favorable and they seem to be working good in the field for most pilots. Latest shipping units should include nice black face pad and external video-in capability.

The main fresnel lens in NOT adjustable, so pilots who wear glasses or who are slightly near-sighted will likely find that the fixed distance between the lens and screen just barely allows a clear focus.

My main use for now will be as FPV goggles on my head. However, the EV800's LCD screen does well in sunlight, so I wanted to try them on my tripod and/or attached to my transmitter. The core display-unit is pretty compact and I like the its "sun-shield" body-case.

For most pilots, the new Eachine VR-D2 FPV Goggles 40ch-DVR will be the better choice because it has a built-in DVR, better antenna system, and the main lens is adjustable. It simply has more desired features for just a bit more money. I have a pair on order.

http://www.banggood.com/Eachine-VR-D2-5-Inches-800480-40CH-Raceband-5_8G-Diversity-FPV-Goggles-with-DVR-Lens-Adjustable-p-1074866.html?p=NR1603976533201412HJ


Saturday, May 7, 2016

Flight Session 47 - Flying on a Windy Day

Middle school fields were mostly occupied again this Saturday. I almost flew in back field but I saw an un-leashed dog running and playing fetch, so I just went to neighborhood Rec-Center field.

80F and Party cloudy - Nova's were getting good SATs and HDOP. Another windy day but I flew anyway (it's good practice).

I ran 3 batteries through the Novas. The new version of Tower on Android is working fine. I created a simple and short Auto-Mission and ran it with no problems.

The new Vant 3000mah LiPo battery is working fine. The PowerModule calibration is good on SuperNova and I really like knowing more about the battery during flight (Tower gives me periodic updates by her voice).

It's also nice to finally having a quad with a more precise altimeter (the SuperNova). It does perfect Land and RTL. Had some spectators. Another good flight session under my belt.

Monday, May 2, 2016

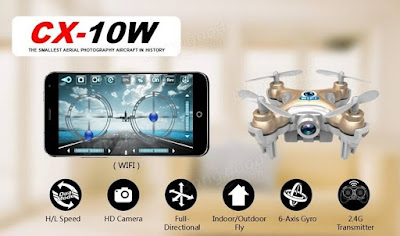
Cheerson CX-10w Micro QuadCopter Review

I got one of these new Cheerson CX-10w indoor micro quads to check-out. Always nice to have something to fly inside when the weather is bad. It seems to pack a lot of technology into a small package. It utilizes the technology of your phone (Apple iPhone or Android) for 2.4ghz WiFi control and FPV HD-video.

Cheerson-CX-10W-CX10W-Mini-Wifi-FPV-With-720P-Camera-2_4G-4CH-6-Axis-LED-RC-Quadcopter


The CX-10w comes well packed in a sturdy box with the propellers pre-installed. You get the USB charging-cable and an extra set of props. You even get a printed manual in English (it's actually pretty good).

Charging:
The battery does NOT have to be removed for charging (which is helpful). Leave the CX10w switched OFF to charge it. Connect the yellow charging cable to the side of the quadcopter and connect the other end to an USB port on your computer or other USB charger (I use the one supplied with my iPhone-5). An orange led-light will come on inside the USB connector while it is charging. The light will turn-off when charging is complete.

app


Install iPhone App:
While it says it also works for Android, this review will talk about Apple and iPhone because that is what I use (iPhone-5 to be exact). Go into the App-Store and search "cx10wifi" or "cx-10wifi" and the proper free app should appear. Install it and run it once to make sure everything is working and ready.

Connecting CX-10w to phone by WiFi:
On the iPhone, you simply connect to the CX-10w like it is a WiFi HotSpot (aka Access Point, router, etc). This is in Settings/WiFi. Switch the quadcopter ON, and you should see "CX-10w-wifi" or similar available for connection. Connect to it (there is no password).

I suggest you leave the CX-10w's Control App's settings as Defaults. This gives you Control Mode 2 (left-hand throttle), and things like "trims" will automatically be saved between flights .While not mandatory, I've found that some simple calibration and initial trimming procedures will help new pilots flying the CX-10w.

Calibration:
With the quadcopter on level surface or ground, click the "Balance-Scales" icon (top right corner) on the app's Control Interface screen. This apparently calibrates and resets the internal gyro.

Trimming:
Try to hover a few feet off of ground. If it hovers in one place, you are done. A little drifting is normal, but if it consistently drifts or "pulls" to one direction a lot, you can gradually/slightly adjust the "trim bars" next to the displayed gimbals.

Flight Tips:
  • Initially, it's better to fly in a large room with no obstacles, and no heavy-blowing fans.
  • If you have a crash, make sure the props are still installed properly and not bent or broken.
  • Have fun and be sure to experiment with the different Flight Modes. For instance, Gravity Mode (spinning-top icon) lets you use the level and orientation of the phone itself for control. Hold the phone completely level and then give it some throttle to hover.
This little quad is durable and flies good (I've had some crashes and nothing broke ... not even a prop). However, it does take a little flight practice and getting used to the phone's touch-screen controls. As a complete package (with these features at this price) I say its fun and worth the money. Only thing is ... my cat doesn't seem too excited about the new addition to the fleet :-)

It just so happens that this little quad is currently on-sale. If you are in the USA, you can even buy from US-Direct warehouse, pay with PayPal, and have it in your hands in less than a week. However, even from the Chinese (CN) warehouse, I usually get items from them in a couple of weeks (3 at most ... ever).


Sunday, May 1, 2016

New Tower for Android update

Just flew around the obstacle course today (aka my backyard :-). Also, re-tested the calibration on my PowerModule, but it looks to be pretty close already.

Knowing Volts is nice, but on a battery with some flight minutes on it (like say 40% used) ... I've found that Volts is only completely accurate if there is about a 2-amp draw on the battery (like the "1-click throttle" or the Arming-Spin). Without a load on battery, the volts are about 0.7 volts higher. I think this might be normal.

I just discovered there is a new version of Tower and 3DR-Services for Android. Looks like it has been released for about 6-months now. I have my tablet set to update Apps manually, and tend to not mess with things that are working.

Seems to work fine and I like the new changes. Go ahead and update anything else offered (I think there is a TTS update also). After updating everything, I rebooted tablet.

Nice to see Fredia still developing this branch on Android. Too bad we can't use the new "Solo Video" stuff on generic APM/PixHawk (I have an EasyCap just sitting here :-).

Don't worry about Wyatt Earp's review ... Google Maps still works (not sure what he's talking about ... sounds like something is broken on his end).

If your tablet supports GPS with a true standalone GPS sensor and antenna, go ahead and get "Satellite Check" by DS-Software while you are in Android Google Play-Store (if you haven't already). It's a nice GPS-Satellite Diags app.