Thursday, May 28, 2015

9 Month Nova-Quad and Pilot Summary

It's been an interesting ride so far.

I had been out of RC-hobby for so long, things had changed (electrics weren't really popular back then) . I didn't even own a 2.4ghz radio-set. My piloting skills were pretty rusty and I had never flown a hobby-class helicopter before.

Between starting with smaller WLT-v262 (as a quad outdoor flight trainer) and then buying the pre-built Nova, I think it worked out rather well. But even after buying the Quanum Nova PnF model, there was a bit of a learning curve ... getting up to speed with:
  • Electric quadcopter hardware (ESCs, Flight-Controllers, etc.)
  • APM hardware in general (Arduino-based FC, GPS, compass, etc.)
  • Advanced APM hardware tech like Telemetry
  • MissionPlanner and DroidPlanner software
  • Quadcopter cameras and gimbals
  • FrSky Taranis and OpenTX
  • Helicopter piloting skills (so you don't crash :)
By having it pre-built, it allowed me to focus my attention on other facets of the hobby while starting-out. There is also a Nova/ CX20 model that comes with a (very) entry level radio pre-installed.

While the stock uBlox GPS-Module works acceptably in clear-sky weather ... in over-cast clouds or back-yards (close trees blocking quad's view-angle to satellites) ... it doesn't work so good. It ends-up providing low satellite detection and a high HDOP (poor GPS signal quality). Aware of it now and not much of a problem since I only fly in "nicer weather (party-cloudy or better) and I also use DroidPlanner (on my Android tablet) to monitor GPS-signal in real-time.

The out-of-control crash-landing into the neighbor's tree last October was a major set-back. Final cause of crash was determined to be ... "attempted RTC (Return-To-China) fly-away" due to flakey GPS (RTL/ Fail-Safe failure). I've had my share of hardware problems involving GPS (turned-out to be bad/flakey cables). Also, with vibrations causing Wobble-Of-Death (WoD). All that is corrected now, and the Nova has proven to be a dependable aircraft in recent flights over the last months.

The new camera gimbal upgrade is great. So great in fact that I know that I always want at least one multi-rotor aircraft running a good camera on a gimbal. The problem is that the gimbal's extra 185-grams seems to have put the Nova close to it's payload weight limit. It is no longer a nimble quad that can be flown close to ground and obstacles. It's more like an aircraft that you carefully fly up to a safe altitude and use for Aerial Photography (AP). In it's new weight class, the quad seems to be under-powered. This also causes it to be more susceptible to the forces of high winds.

To be perfectly honest, I think some of the problem might also be my (slowly advancing) helicopter piloting skills. I simply don't get that much "stick-time" to practice (I need to resolve that if I want to progress). Currently, I still rely on a powerful and nimble aircraft to get me out of hairy situations. I still have a fairly constant fear of crashing and of a fly-away (due to GPS failure). The extra weight has definitely made it less responsive. Hopefully, I can tune some of that away.

Anyway, I still love this hobby. For me, it's always been about the hardware building, electronics integration, programming config, and the piloting challenge of RC-Aircraft (now robotic ones).

It is possible to stay safe and push-your-limits at the same time. I think that is part of the fun and excitement of the hobby.

The Quanum Nova (Cheerson CX-20 clone) has proven to be a good aircraft and valuable introduction into the world of RC multi-rotors and ArduCopter for me. Sure, it's only a little 350-class quad and it's (nice looking) plastic body is kind-of fragile (if you crash-land), but I still like having it in my "hanger". It is GPS capable and it's been a good model in my progression through the hobby.

Wednesday, May 27, 2015

Test Flight eval and Maintenance

Adjusted Extended Parameter (main PIDs) to be the same as I was running last on v3.1.2 (just some small edits ... nothing major). Set THR_MID to 650.

Gimbal is working pretty good. However, I think it needs some tweaking to get rid of occasional "motor buzzing" and also to remove a bit more jello. It was pretty windy (and quad was getting tossed around quite a bit) so that might have been the cause.

Removed black foam padding from bottom of battery-bay so my batteries will fit and pull-out easier. With the added power draw of gimbal ... seems my Turnigy 2700/25c puffed-up a bit and got hotter than ever (but they were already a tight fit).

Retrieved logs. Vibrations are only fair. Balanced props on my trusty DuBro Balancer. They have gotten scratched up in the last month or so, but still needed little to no balancing.

Flight Test with May 2015 Mods

Well, it stopped raining here in Texas long enough to do a flight test of the following Mods
  • Upgrade to ArduCopter v3.1.5 (custom Cheerson Uart) and default params.
  • Eachine SimpleBGC Lite Metal Gimbal install (carrying Mobius)
  • FrSky Sbus to CPPM Adapter
  • New Taranis programming (Flight Modes and Logical Switches)
  • APM_252 FC-case Barometer Mod. 
Flying conditions and site were not ideal. Winds were 12mph with gusts and I was in the back-yard where there is no space (unless you like trees and buildings).
 
It needed an AutoTrim before it would do a decent hover, and THR_MID looks to be around 650 (635 wasn't enough).
 
Vinnie's custom AC3.1.5 seems to be working fine.
 
The gimbaled and stabilized Mobius video looks great, but man ... what a trade-off. Does "flying turkey" ring a bell? Not sure I like it.
 
Also, for the first time, it puffed my 25c battery a bit, and it was real hot.

Off to tune some PIDs and balance my props.

Landing Gear Mods

Need some extra height for gimbal. I'll try to put evolving LG mods all on this post.

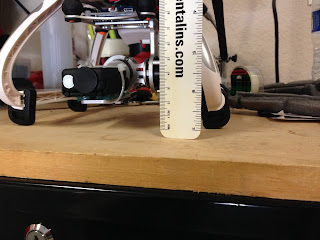
Tried this mod first. Lowest part of gimbal to desk is 3/4 inches. Had to remove because it makes landings too difficult on hard surfaces. On the slightest rough landing, these act like springs, and bounce the quad back into air. It then flips over and crashes upside down. Removed after a couple of batteries thru.


Try two. The lite-foam pipe-insulation seems like a good material to get some height. Lowest part of gimbal to desk is now 7/8 inches (so a little better). I would prefer it to be stiffer, but it's not too bad. Notice it's 2 layers thick (but only on bottom for max. height). Inside layer is not complete tube/circle and is tie strapped to LG first (to prevent slippage). Black rubber bumpers are not needed and saves 13 grams. Will try it for a few flights.

Only cons are ... it will bounce/flip on hard landing and ... foam surface catches wind (rocks gear?).


EDIT 2015-07
 
Well, I think I found the best way to mod the stock white plastic landing gear for use with 2D gimbal. These will raise the lowest point of the gimbal to 7/8 inches or 23 mm ... as high (or better) as foam, but without the surface area (acts as sail in wind) and springy-ness.
 
HK now has Extended Rubber Feet for Landing Gear Skids -
Fits Quanum Nova and Cheerson CX-20.


Tuesday, May 26, 2015

FrSky Taranis - 6+2 Flight Modes and Logical Switches Setup

With DroidPlanner running on tablet (touch-screen access to all Flight-Modes), it hasn't been a big priority for me, but I finally got around to setting up all my Flight-Modes and Logical Switches on the Taranis (using OpenTX Companion).

They are now on 3+2 switches.


My Flight Modes for AC 3.1.5:
1. Stabilize   (SD-down)
2. Loiter       (SD-up)
3. Alt-Hold  (SD-mid) (SG-up)
4. Drift         (SD-mid) (SG-mid)
5. Land        (SD-mid) (SG-down)
6. Auto        (SC-mid)

... and in Extended Tuning:
CH7 = Simple-Mode & Super-Simple w/ GPS (mode modifiers)
CH8 = RTL
(both of which have own dedicated Taranis switches ... SE & SF)

So, how did I come up with this? Well, my main-mode switch does my 3 favorite Flight Modes. Up (to sky and GPS sats) and Down (to ground and me) are the easiest to find (without looking). If left in the middle (it holds a hover and it's altitude ... I use this a lot). Also, now with the secondary-mode switch, it can be changed to 2 other more rarely used modes. RTL is on it's own switch (easy to find for emergencies), and so are the 2 Simple-Modes. Finally, a separate switch for Auto-Missions.

It helps to write down "the logic" of what you want before starting. This is how I did it (with some help from ScottFlys as I was learning).


EDIT May 2019:
The Logical Switch programming and Special Functions have been enhanced for this model (now named Nova-360). It now has enhanced sound features.

Monday, May 25, 2015

Upgrading firmware to 3.1.5 (Cheerson custom Uart version)

I'm finally upgrading to ArduCopter v3.1.5. VinnieRC took the time to re-compile a custom Cheerson Uart version of v3.1.5. Now, Telemetry/Uart port works on this Cheerson APM_252_v2.0 Flight-Controller. I installed it from MissionPlanner v1.3.27. .

I like v3.1.5 because:
- The major v3.1.2 "randomly kill throttle in flight" bug is fixed (yes, I've experienced it)
- Terminal feature (for Diags, Troubleshooting, and Settings) is still in Code and works.
- The code is simpler than v3.2.x, and I think it runs better on the limited processor power of a little APM-based unit, without getting dangerous cpu "LongLoops" cycles. Reportedly, v3.2.x can over-burdened the limited APM with "staying stable in wind" calculations and altitude-control suffers. You can even keep your (processor intensive) detailed Logs recording enabled. I'm willing to give up v3.2's Position-Hold flight-mode, Spline-WayPoints, (and a few other little features) ... for a more stable, dependable, and easier to troubleshoot aircraft (at least for now).


I Reset Parameters to Default. I will add my custom parameters from a pre-written list, manually later.

These are some AC3.1.5-Defaults. However, some are different than v3.1.2-Defaults, so I thought I would list them here (since they are important to be set like this). I am using 915mhz radios, but no PowerModule yet.

AHRS_GPS_DELAY,2
AHRS_GPS_GAIN,1
AHRS_GPS_MINSATS,6
AHRS_GPS_USE,1
AHRS_ORIENTATION,0
ARMING_CHECK,1
COMPASS_EXTERNAL,0
COMPASS_ORIENT,0
COMPASS_USE,1
FENCE_ENABLE,0
FRAME,1
FS_GCS_ENABLE,0
FS_GPS_ENABLE,1
FS_THR_VALUE,975
GPS_HDOP_GOOD,200
PILOT_VELZ_MAX,250
THR_MAX,1000

I purposely reset my parameters to get a fresh copy of v3.1.5 defaults (and to not carry-over any depreciated params). The params and settings listed below will not really include any that are already correct as Default. I also don't plan to give explanations for each, so you can just search my blog for notes and definition of each.

I then did a complete calibration of all Mandatory Hardware (radio first). Compass calibration seems a bit different this time.

Set my Flight Modes:
1. Stabilize
2. Loiter
3. Alt-Hold
4. Drift
5. Land
6. Auto
... and in Extended Tuning, CH7=SuperSimple and CH8=RTL
(which I have on dedicated Taranis buttons)

Changed these non-Default parameters:

FLTMODE1,0
FLTMODE2,5
FLTMODE3,2
FLTMODE4,11
FLTMODE5,9
FLTMODE6,3
CH7_OPT,13
CH8_OPT,4

ANGLE_MAX,3000
FS_BATT_VOLTAGE,6
FS_THR_ENABLE,1
LAND_SPEED,30
LOG_BITMASK,958
MOT_SPIN_ARMED,0
RTL_ALT,2000
THR_MID,660
WP_YAW_BEHAVIOR,1

My starting PIDs, but also AC 3.1.5 Defaults


I guess it's ready for a test flight, THR_MID determination setting, Auto-Trim, etc.

I used the above params for the first test flight.

Parameter History:

After first test flight with above Default v3.1.5 params, I changed them to this. This few edits makes them the same as my last (working fine) v3.1.2 params.

Flight Session #21 used these. THR_MID,660. These don't work so good any more, so it must be the extra weight of the gimbal that is installed now.


Current Parameters:

On Flight Session #23 changed to these (below) Nova params that I got from Skywarka. They are the best yet and flew the Nova nicely (with gimbal). Also, the Mobius audio for the motors sounds better and more even. Logs and logging are still working fine. Final THR_MID for this weight is 670.


This is my Nova's current param changes list (over-rides any values above) as of July 11, 2015
COMPASS_EXTERNAL,1  (yes, external compass - my mod only)
COMPASS_ORIENT,2        (yaw compass 90 degrees - my mod only)
GPS_HDOP_GOOD,220     (extra buffer that effects final GPS accuracy very little)
RTL_ALT,4000         (don't want to RTL into the side of a tall structure on hilly terrain)
THR_MID,670                     (for All-Up-Weight of 1153 grams)
WPNAV_LOIT_SPEED,800
WPNAV_SPEED,700


Sunday, May 24, 2015

Compass Calibration procedure

Did I miss a memo? It seems the Compass Calibration procedure has changed?

Edit 12-2016 : Many in the forum pilots say "Dennis Balwin's Way" is the best way to calibrate compass. Also, if having trouble over 915Mhz SiK Radios, try a good USB cable. OK ... now back to the old post.

Now, it's just ... "One strategy for capturing all the white dots is to rotate the vehicle slowly so that each side (front, back, left, right, top and bottom) points down toward the ground for a few seconds."

It's more like the linked video. There is certainly no "dancing" or "chair spinning"in that video.

All I know is that I'm trying to calibrate the compass via 915mhz radios. After trying "compass dance" and "spinning chair method" ... MP errors out before it Auto-Completes. Many white dots are still left.

Best I can tell, after some testing (and multiple tries for a clean compass calibration) the new procedure is very easy.

Initial Setup/ Mandatory Hardware/ Compass/ Live Calibration (at bottom)

Holding the quad in front of you (like it's hovering) ... you slowly rotate it these 3 ways (toward ground), until it's back where it started from.

1. Pitch forward 360 degrees (toward ground). Two complete times (2 revolutions)
2. Roll it 360 degrees (toward ground). Two complete times (2 revolutions)
3. Yaw it 360 degrees (on it's side, like a wheel rolling on the ground). Start with motor(s) pointing directly to ground and Yaw it all the way around. Two complete times (2 revolutions)

Toward the end of step 3, it should beep (auto complete) and give you the Offsets. If it won't complete:
  1. Just try again. If done clean--and-fast it seems normal for it to Auto-Complete early, toward end of step 2. If it misses a dot early, it's easier to just reset.
  2. Be sure radios aren't too close (resend errors cause dots to not populate properly?).
  3. Go slower and turn more perpendicular and carefully. Slightly sway as each major "face" points straight down to earth.
  4. Start over and add step 4 below ...

4. Hold it like a cross (instead of X) and pitch-rotate so each motor points to ground. Turn it 90-degrees and do the other 2 motors. Some time during this Step-4, it should Auto-Complete.

It's something real close to this I think. I used the above, got a nice (clean and fast) calibration done (over 915mhz radios with ECC on) and haven't repeated it since. It's been working fine in flight.

Notes:
  • It's normal for it to show 2 compasses. It's normal for phantom/un-used Compass-2 to show Error:99.
  • This is with AC 3.1.5 and MissionPlanner 1.3.27.
  • I think it's better to go outside to do compass calibration. This removes any chance of structure interference during calibration or general compass operation (finding exact North, etc.).
  • I leave Auto-Dec on and go outside to calibrate compass. This allows a basic GPS fix and then FC can use Auto-Dec (lookup-table based on GPS). I'm not sure if Declination is used during calibration or not, but maybe it is.
    • If inside with no GPS, I temporarily turn-off Auto-Dec and set it manually during compass calibration. However, other benefits of going outside are undeniable.
  • My original Compass Calibration notes are in a section here (most still apply). The last time I previously tried to calibrate my compass (months ago) the normal "compass dance" worked fine for me. But not now.
  • If compass is set to External, it uses the compass's orientation parameter (COMPASS_ORIENT,0). If set to Internal (COMPASS_EXTERNAL,0) it's ignored (and instead uses the FC's orientation). Pretty sure that is the only difference between them.
  • After compass calibration, MP should give you a pretty good indication if your compass is working. Watch heading as you yaw and pitch quad on table. While testing (only), don't power-up with Nova pointing direct North (the FC's default when no compass is attached).
  • You only need one good/clean compass calibration done on quad. You don't need to keep re-calibrating it every time you fly or even at a new field or even country. The only time you need to recal is if you re-mount compass due to frame upgrade, crash, or something like that (and then you are back on the work-bench running MissionPlanner anyway). Once the compass is calibrated, you are done. Everyone should leave Auto-Declination Enabled. When you go to any field, you will have a minimal (4-6 satellite) GPS 3D-fix anyway. The flight controller uses this to look-up actual Declination on stored table.
  • After compass calibration, you can check quad against a good quality conventional (old-school magnetic) compass. Test in all 4 directions and at various quad pitches. Do not use cell-phone compass. Do not get cell-phone (or similar device) near compass, especially not while calibrating or checking.

Saturday, May 23, 2015

Improving Barometer Altitude Detection on APM_252 - Quanum Nova FC case Mod

I've seen some Cheerson CX-20 Flight-Controller cases with large holes over barometer (but still has gray foam inside). Compared to those, my Quanum Nova one is being suffocated :) It might not be able to detect atmospheric as well, or might be adversely affected by circuit board heat.

Anyway, I did this simple mod. I just removed top cover and drilled a 3/16" hole through it, near where the barometer sensor is.


 It already seems to be working better while on bench and floor (more accurate and less drift while at rest).


 NOTE 2015-06 : Ever since I did this mod, my Barometer seems to be "drifting" more (not holding, even while sitting on desk). Not sure if I'm just paying more attention to an existing problem, or if it actually caused the problem. In flight, my Altitude-Hold Mode also drifts or holds poorly. At this time, I would not recommend this mod. I put some packing tape over new hole to block 80% of opening. It's back to normal now. It works better outside than inside, but that's ok.

Saturday, May 16, 2015

USB Mod (Lower PCB Port functionality replacement)

So, the lower PCB-Port board provides the following functionality.
  1. 12v
  2. 5v
  3. RC Signals
  4. FC Micro-USB to Mini-USB
1 has already been run for gimbal (and whatever else), plus I never liked that stock thin wire. 2 is not really needed. 3 is run for gimbal. I have some ideas for 4 (since I'm still running v3.1.2, I kinda need it to get my logs and Terminal access).

I went ahead and loosened Power-Board and removed this PCB. It's not really needed any more and the gimbal blocks it anyway (USB port is inaccessible now). It weighed 9 grams.


It's removal now provides another cavity that might could be used for something. 915mhz radio would fit there if I hadn't just wedged (and foam-taped) it into the other side.

While I could have left this assembly intact, I don't ever see a scenario where I might need to re-install it. So, instead of making my own Micro-end plug, I just cut this one off for re-use. I ohm-out Micro-USB pins and verified wire colors ... they appeared to be standard USB pinouts. Not sure why most websites show variations of USB-Mini pinouts with 1,2,3,x,4 ... I just refer to it like the Micro-port with 1,2,3,4,5.

USB:

I think I will again use Mini-USB as external port due to it's low-insertion force. This one from DigiKey is mostly nylon (weighs about 2 grams) and has a nice insertion snap to it (feels more secure than stock one). On the back of it, I suggest you ohm-out pins so you know where pins1-5 are.


Soldering USB cables proved to require some skill due to thin-delicate scale (high gauge) of parts. I turned the soldering-iron down to 340c, but you still have to be fast and exact. I used helping hands to hold pre-tined wires on tiny pins. Then, use both of my-hands to quickly apply iron and new-final solder. I think it came out pretty good.
 
You connect Pins 1, 2, 3, and 5 straight thru (not Pin-4 as it is ID-OTG). Make sure they are secured and soldered properly, but never pull or tug on these wires. You can use heat-shrink on all 4 pins if you want, but I think Pin-3 (Green) is only one that requires it, due to proximity position in pin-out.


Passes the "smoke-test" ... works fine with Windows USB device detection and MissionPlanner. This completes the custom mods required to replace the functionality of the removed stock lower-port PCB.


Other possibilities for remote USB include using after market cables run out holes or mounted in body. You could also have something tucked inside battery door. Finally, I think a small hole cut in just the right place would allow a micro-usb cable with a long handle to reach the FC's directly inside.
 
Here is the current final internal config before installing all the body screws. Telemetry 915mhz radio is back inside. I discovered my ECC has been on this whole time, so I turned it off to see if it might help with Droid-Planner RSSI warnings. Didn't help, so I turned it back on (which is the default).
 
One X8R antennae had to be moved and is now foam taped to top of X8R now. It's still at 90-degrees to the other back one, but I'll be watching FrSky RSSI.


Monday, May 11, 2015

FrSky SBus to CPPM Converter install on X8R to APM 2.5

Since I need some channels for my gimbal, I finally installed my FrSky SBus to CPPM Converter.


This is how you connect it. It goes from X8R's SBus port to APM's first channel (marked A on this FC). Watch orientation of yellow signal wire and you should be fine. You also install a standard jumper on SIGNAL PINS 2 & 3 of the Flight-Controller. The X8R now uses this single cable to communicate to FC for RC-Channels 1-8.

It also powers the Flight-Controller (this is how the FC gets power now). The only other X8R-RX cable pictured here (black-red-white) is BEC+5v input power from PowerBoard.

Radio Re-Binding:

Since my Nova (Model #1) was previously Bound in Mode-1(D8), I needed to re-Bind X8R to Taranis in Mode-4(D16). The 8 physical ports on the X8R will now become RC-Channels 9-16.

Follow X8R binding procedures in manual sheet. Basically, you need 2 jumpers installed and be carefully pressing F/S button (behind tiny sticker-cover) BEFORE you connect battery to X8R. After it powers-up, you can release F/S button. X8R should now be in Binding Mode.

At the Taranis TX radio, you access your aircraft's Model Setup (mine is Model #1 called Nova).
- Internal RF
- Mode: D16
- Channel Range: CH1-16
- Receiver No: 01

Then, you select BIND menu option on Taranis. The Taranis will chirp. The LEDs on X8R might change. It should now be Bound. Exit Taranis menu. Power down X8R and remove jumpers. Power-up everything again and it should be working like before.

Model #2 will use Receiver No: 2, and so on.

The green LED on X8R should be on (and maybe flickering). If basic FrSky Telemetry is working, that's a good sign. The props were off so I tested Arming and it worked fine. Taranis programming it still there.

While I haven't flown it, I re-connected to MissionPlanner and there doesn't seem to be any missing programming or re-calibration needed. The Binding seems to be completely separate from all that. The one exception is FailSafe Mode. Either using OpenTX Companion (or conventional way at RX itself) you need to set FS Mode from "Hold" back to desired "No Pulses". Then, re-test Fail-Safe with FC.

In retrospect, I should have done this in the beginning or sooner. Not only does it simplify FC-RX wiring, the suggested Binding Mode-4(D16), enables a whole set of new channels.

Sunday, May 3, 2015

Gimbal Install - Eachine Light-2D Brushless - BaseCam SimpleBGC

My inexpensive Eachine 2D brushless gimbal from BangGood arrived. This post will be continually updated until setup and install is finished.
Looks like a cloned 8bit BaseCam compatible controller

Weighs 158 grams. Height is 95mm.
Still not sure exactly how I will mount this to Nova (with lower-port blocking issue). But I'm eager to check-out SimpleBGC, so I setup this bench-mount real quick. With Mobius (and using it's 1/4" screw mount), it made more sense to me to just turn gimbal 90 degrees and spin arm around 180 degrees. Powering with 11.1v lipo (just using balance plug for now). Out-of-box it works quite well, and only a bit of motor buzzing sometimes.


I downloaded and installed the older 8-bit SimpleBGC v2.2-b2. This Windows program requires Java (runtime). It reports Board = 1.0 and Firmware = 2.2 b2. All seems to match close enough to prevent warnings. I just found this video, and while I didn't really use it, it does seem to cover the basics.

This appears to be a cloned-controller, so I think you are risking a bricking with flashing any other firmware (see forum reports). I'm not planning to do any firmware upgrades.

This version of SimpleBGC is fine and seems to work good. The "Silicon Labs CP210x USB to UART Bridge" driver loaded fine on this laptop. Mine connects with COM5. Its Cycle Time is counting and there are no I2C errors reported. Since it appears to have retrieved the current settings (from the controller) on start, I saved "Profile 1" as the shipping-defaults. Lots of settings here and I suggest you consult manual docs and not change anything that you are not familiar with.

This is what I ended-up with and seems to work "on bench". This video helped. Even swapped, his GoPro PIDs don't seem to work with Mobius (R=10,0.4,8 / P=6,0.4,6). The video's temporary Motor power to 0 tip works, and is how to find proper new axis and get gauges reporting properly. I kept re-calibrating (both AAC & GYRO) after each major change. Some changes (like Sensor Axis) seemed to require a controller reboot (power-reset). I got gauges working (as viewed from behind gimbal).

Motor power is lower due to less weight. Power and PIDs get swapped due to opposite form-factor of Mobius over GoPro (weight on different axis). Right Sensor is now Y.  

This is how you "swap Motor-Output wires" in software. You also want "High-Silent" here.


Made Roll and Pitch more reasonable (to prevent mechanical binding with RC). I know mine can't Pitch to 90 degrees, but might be closer to 75 (will have to check later).
 
This is my first gimbal and any time spent learning, tuning, and using SimpleBGC.

It's a little confusing, so I welcome any comments if I got it wrong. From a standard GoPro install, there are 2 things that I see that are different (I also list required SimpleBGC changes due to each):
1. Gimbal is rotated 90-degrees, so axis shift.
  • Motor Outputs (for Poll and Pitch) are swapped
  • Sensor axis "Right" changed to "Y".
  • When you get these right, notice gauges start reporting properly
2. Mobius camera is opposite "weight-ratio form-factor" vs GoPro (its longer than wider).
  • Motor Config Power percentages are swapped
  • PID Controller values are swapped
  • Lower Motor Power equally since Mobius is over-all lighter

Actual Installation

I'm installing in the default position (mostly under aircraft or toward CG) using both mounting screws. I thought this might help with balance since Mobius sticks-out in front. This "light version" is a bit different than original (heavier) metal version. Lower ports will be blocked with this gimbal (but no problem). I previously Dremel-ed some lower holes in Nova's plastic body, so I will use those to bring down power and signal wires.

I crafted a 6mm thick spacer of scrap plastic about 55mm long (6mm X 17mm X 55mm). This goes between the gimbal and body and provides a stable surface. I mounted the gimbal with two 2.5m-X-13mm metric screws. Make sure that screws don't protrude inside and scratch battery (use washers). Position so that landing gear is not touching gimbal frame (at least by 0.5-1mm)


Removed white power connector from gimbal and soldered on a female red JST socket connector. Since batteries come with red-JST males (plugs), seems like payload devices should have a female (sockets).

Soldered a male red JST plug connector to PowerBoard's 11.1v Lipo battery output. It turns-out that where a capacitor could have gone (but was apparently decided to not be needed) is "in parallel" to main battery. I used about 15cm of 22awg wire. Hard to tell, but wires go thru PCB-Vias (tiny holes) and slightly protrude on other side. I think this is more appropriate (than stock thin wire), and should be able to safely provide enough amps to all payloads under Nova.

 
This JST goes just outside lower quad to supply 12v to gimbal and whatever else.


The top-right 2 pins are gimbal controller pitch and roll. I ran my own 2 wire cable for signals only. To the inside and channels 9 & 10 on X8R-Tx (see next Blog post). Programmed Taranis Mixer to manually control them with S1-S2 pots.


With Mobius moved slightly forward, needs about 4-grams to balance. I put it here so I can use less weight. This is for 18mm space to connect Mini-USB (Down Angle plug) charger cable. Perfect balance without weight is a few mm back (but then, only a heavily-modified custom Mini-USB plug will fit in socket). Turns out, this standard Mini-USB cable will also fit Nova and Taranis.


You get all the details on my Blog, so in the "spirit of full disclosure" ... This is the only draw-back to this 90-degree swapped-axis mount. The camera down-pitch is slightly limited (due to frame). While the conventional install doesn't have this limitation, it has others including needing more weight to balance and no way to get lens this close to center (without turning camera upside-down I suppose). You would also need to use foam tape (or build a custom mount) if you want any kind of space behind camera for "always connected" FPV cables.


So I think this is the lesser of two-evils. I will work on fine-tuning programming on limits to prevent binding. The gimbal can always be changed (easily rotated back) later or I might even eventually upgrade to a new camera (likely a 1080p/60fps GoPro clone) and use the Mobius somewhere else.

Current PIDs and Mounting:

After some flights and testing, (and try other PIDs) I'm currently back to running the ones you see above. They are basically the Defaults that came on the controller. However, I've swapped them as required for axis swap. "Motor Config Power" was lowered about 10% each since Mobius is lighter than a GoPro) ... helps with "gimbal buzzing".

I've also modified the mounting slightly, but have decided not to publish those steps until they are proven by better quality videos.